Run your first data import
Easily upload an Excel or CSV file, or even synchronise Orginio with an HRIS system such as ADP Workforce Now, ADP Vantage HCM or BambooHR.
Import steps:
1. Register for orginio at orginio.com.au
2. Choose your type of structure (person, position or org unit)
3. Select ‘import data’
4. Select your relevant data source (for Excel and CSV – search & select the approriate file to upload)
5. Define the unique identifier field (e.g. personnel ID or email address)
6. Define and map the remaining fields (define relationships, data type and the corresponding field in orginio)
7. Check hierarchy, persons & import protocol for issues
8. Select ‘start import’
Video example:
Import profile pictures
Import steps:
1. Create a .zip file containing employee photos, all labelled with the matching personnel ID
2. Click on ‘data import’ in the top menu of orginio
3. Select ‘profile pictures’
4. Click on ‘SELECT THE FILE’ and search for and open the .zip file you previously created
5. Select ‘start import’
Video example:
Add additional data to an existing chart
Import steps:
1. Click on ‘data import’ in the top menu
2. Select the Excel file that contains the additional information
3. Orginio will automatically identify the columns of the imported data
4. Click ‘next’ and select ‘additional import’ to add the new information to you company’s structure
Video example:
Overwrite data in your org chart
People join or leave the company. Employees move to other positions. Teams are restructured.
If you’ve already updated the company structure in an Excel file, you can update your org chart automatically by reimporting the data sheet.
Import steps:
1. Click on ‘data import’ in the top menu
2. Select the Excel file with the updated data
3. Orginio will automatically identify the columns
4. Synchronize the data to update the existing online org chart
5. Objects that were not part of the new import file will now be deleted
Video example:
Import sensitive data
Want to import sensitive data that is not for everyone to see? In order for this to work, you’ll firstly need to set up user types via access control permissions.
Import steps:
1. Click on ‘data import’ in the top menu
2. Select and open the Excel file with only the sensitive data labelled with the relevant column label, plus the unique identifier field
3. Create a new field or select the existing field to synchronise. Once open, select the ‘access control’ tab
4. Select ‘+ PERMISSION’ and identify the appropriate user group and permission level (e.g. Executives + view and search access)
5. Select ‘save’
6. Select either additional import if you are adding additional data or synchronise if you are updating existing and select ‘START IMPORT’
7. Once you finalise the import process, the data will be updated and is only visible to the selected user group
Video example:
Schedule regular data imports
Scheduled automated data imports help you keep your org chart in orginio up to date. You can choose how often your data will be updated from your source.
Steps:
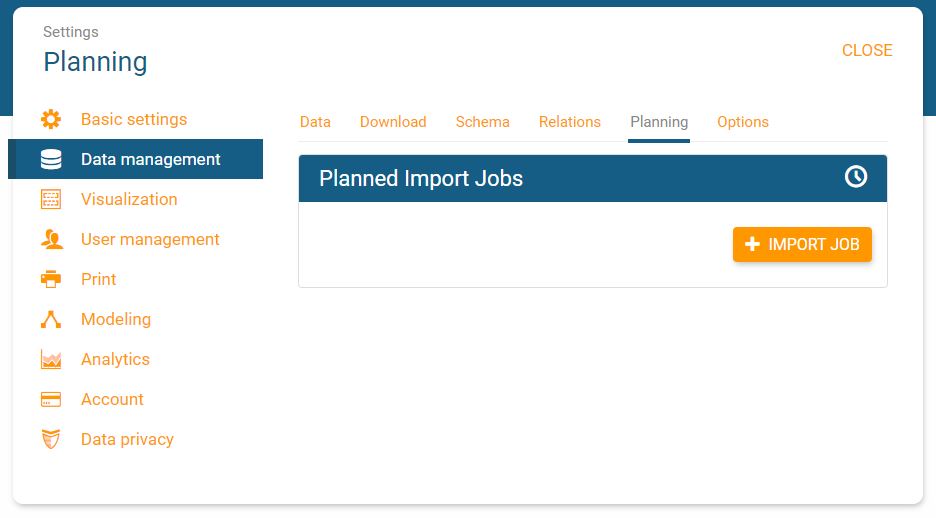
1. Navigate to settings and select ‘Data management’
2. Click on the ‘Planning’ tab and then ‘+ IMPORT JOB’ to configure a new automated import
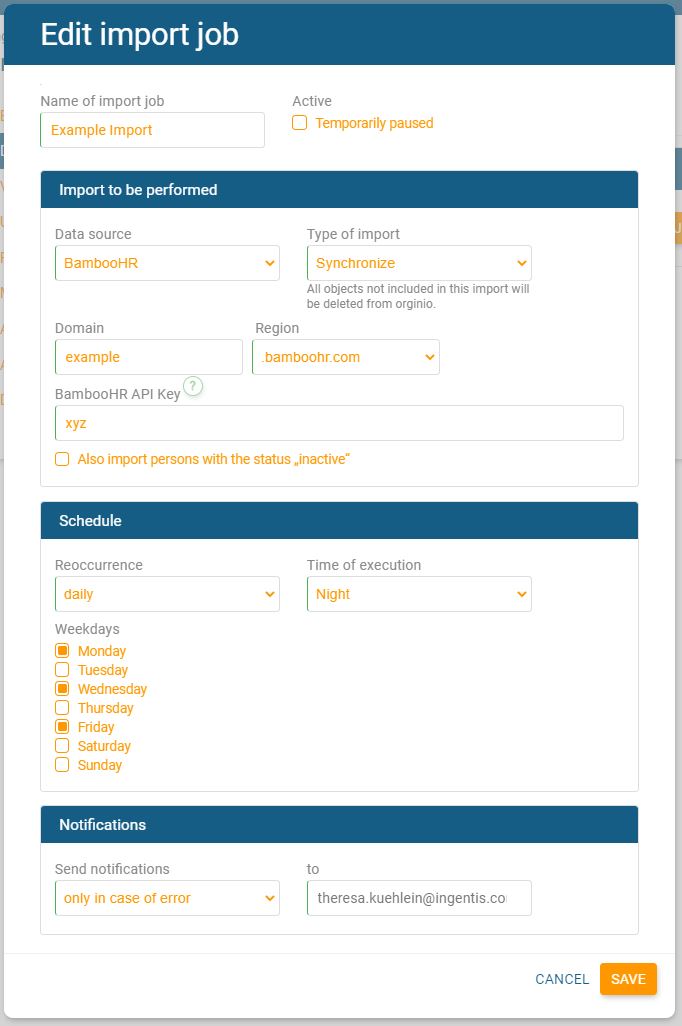
3. Define the parameters of the import job:
-
- Name the import job
- Choose your data source and the type of import (synchronise or add additional information)
- Set the schedule for the import (e.g. monthly or daily refresh – if you select daily, you can choose if you want to import every day or just on certain days)
- Define what types of notifications are to be sent and to which email address
- NOTE: This is also where you can temporarily pause the job, if necessary
4. Click ‘SAVE’ and you are all set!
Now you’ve automated data imports, outdated org charts a thing of the past!
If you’re having any issues with your data import or anything else, please don’t hesitate to reach out to our team. We’d be happy to walk you through it.


